Small steps
The title pretty much says it. Things are busy around the house, so I'm limited to a bit of time here & there to work on the radios. Priority #1 is the Philco. I really want to keep working on it steadily, making good if slow progress. So most of what I've been doing is shopping for all of the stuff I need. Chemicals, more clamps (you can never have enough of those), etc.
So I figured that before I do anything more with trying to put the cabinet back together, I really ought to strip the finish and see how bad it really is. So I picked up some Formsby's Refinisher. This is not really a true stripper. A regular stripper will remove everything. Shellac, lacquer, stain, etc. It takes you down to bare wood (well, it's supposed to, anyhow). I wasn't so sure that's what I want. Someone on ARF (see the link to the right) recommended using a "furniture refinisher" rather than a stripper, so that's what I got.
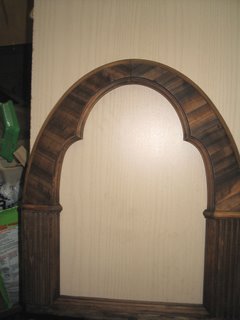
I have to say that I'm very pleased with the results. It took about an hour and a half, but I stripped the whole outer front, as well as the base moldings. The wood - particularly on the moldings and the lower columns, is pretty worn in places, and as a result, they look a bit blotchy. But the Formsby's did take all of the old finish off, and I must say I'm really happy with the way the veneer on the arch came out. I was dithering about whether to replace it all, or just try to patch the bad spots. I think I've now decided to try to preserve the original veneer as much as possible. The grain just looks so nice now. My biggest concern now is how I am going to match the old veneer.
Here's what it looks like now:

 My first thought was to see if I can salvage some veneer from the back part of the case. I stripped a small area of it, and while it does look nice, it doesn't look like a very good match. So I guess I'm going to have to figure out where to get some of this veneer. One place I need to look at is the backside of the arch. It looks like there's some kind of veneer over that, so maybe I can steal a large enough piece to use as a patch - if it matches.
Here's what the veneer looks like from the top/side part of the case:

Sorry for the picture quality. It's hard shooting this stuff with a flash, but since I get most of my work done after 10:00PM, I don't have much choice. Anyhow, as you can see, this veneer is much redder than the front arch. At least it is after removing the old finish.
I know I don't need to get too concerned about the condition of the wood - after all, the reason the original manufacturers used toning lacquer was for that very reason - to hide the differences between the various kinds of (cheap) woods they used. But for certain parts, I do think I need to take some care to match the grain and the color as best I can.
I still have to figure out what I'm doing with the top/side (I think I'm going to try a stain, and see if that looks good enough. Otherwise I'll need to get some veneer) and the inner front. The inner front, with the scrollwork, is likely going to have to be re-veneered. It just took too much water damage, and has warped and shrunk a bit, so that the seams have split apart. I really want to just start over here.
So that's the status. I guess the next step is to go over it all one more time to make sure the old finish is completely gone from all of the nooks & crannies, then I need to move on to the veneer repair/replacement. I picked up some naval jelly too, so in my spare time (yeah, right) I can get started removing the rust from the chassis.

0 Comments:
Post a Comment
<< Home